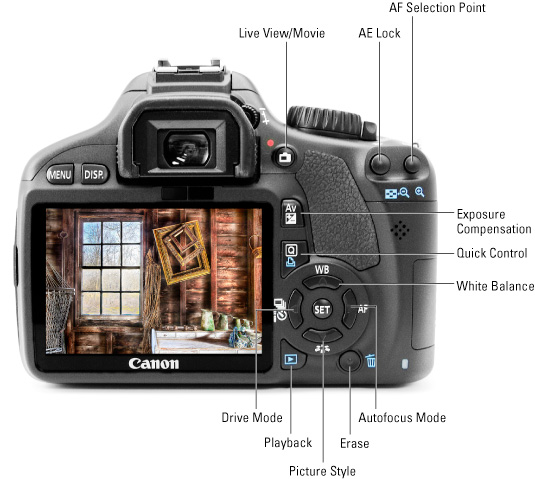
- Drive Mode – dictates how fast each photo is taken, and how many photos are captured with each press of the shutter button. Options include the following:
- Single shooting, continuous shooting, silent single shooting, silent continuous shooting, 10-sec self-timer/remote control, 2-sec self-timer/remote control.
- Playback – allows you to see all photos taken on your memory (SD) card.
- Picture Style – brings together the settings for image processing parameters and color matrix settings.
- Erase – allows you to erase the photos currently on your memory (SD) card.
- Autofocus Mode – allows you to turn on/off autofocus mode
- White Balance – leave on auto if you are a beginner. The camera is good at picking this setting on its own.
- Quick Control – allows camera settings to be controlled via the arrow keys. To use, click this button and then use the arrow keys to select the setting you wish to change.
- Exposure Compensation – allows control over the aperture while in manual shooting mode. This allows you to make the camera expose lighter or darker than the camera’s meter would normally operate under.
- AF Selection Point – Autofocus selection point
- AE Lock – Automatic exposure lock. This setting prevents the camera’s aperture and/or shutter speed settings from adjusting as the camera is pointed in different directions.
- Live View/Movie – this mode opens up the mirror and the shutter in the camera to display a live image from the camera’s sensor on the screen. If live view is enabled auto focus will be very limited.
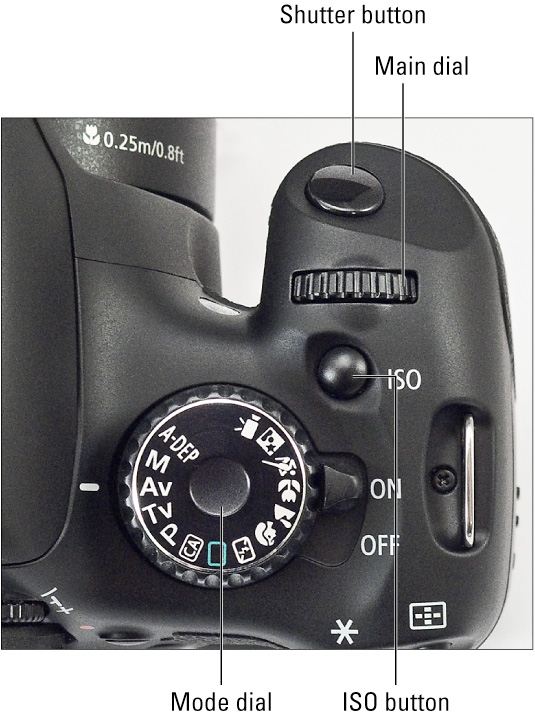
- Shutter Button – takes the photo; hold it half-way down to focus the lens, and push all the way to capture the photo.
- Main Dial – allows you to adjust aperture and shutter speed.
- ISO Button – allows you to adjust ISO.
- Mode Dial –
- A-Dep: Automatic Depth of Field (DoF); this determines how much of the image will be in focus. The camera will choose an aperture based on which part of the photo needs to be in focus. Good for taking pictures of large groups of people, landscapes with foreground detail, or anything with carrying distances from the camera.
- M: Manual Exposure Mode; allows you to manually select shutter speed, aperture, and ISO sensitivity. Requires a decent amount of practice, not recommended for beginners.
- Av: Aperture Priority or “Aperture Value”; good for changing Depth of Field (DoF). Allows you to manually select aperture, while the camera selects shutter speed and ISO sensitivity.
- Tv: Shutter Priority “Time Value”; good for freezing or blurring motion. Allows you to manually select shutter speed, while the camera selects aperture and ISO sensitivity.
- P: Program Mode; camera’s auto functions select shutter speed and aperture. Has the ability to override camera’s choice.
- CA: Creative Auto Mode. A cross between program and full-automatic mode.
- Green box: Auto mode; camera will select all settings based on the scene to include auto focusing and flash.
- Auto flash off: same as auto mode (green box), but with flash disabled.
- Portrait: Designed to produce softly focused backgrounds for flattering portraits.
- Landscape: Designed to keep both near and distant subjects in sharp focus.
- Macro or Close-Up: Produces softly focused backgrounds; especially suitable for close-ups of flowers and other nature subjects.
- Sports: Selects faster shutter speed to capture moving subjects without blur.
- Night Portrait: Same as portrait, but with flash mode set to Slow-Sync, resulting in a slower shutter speed to produce softer lighting and brighter backgrounds.
